Deploying JHipster Microservices on Azure Kubernetes Service (AKS)
Deploying JHipster Microservices on Azure Kubernetes Service (AKS)
Series · Microservices with JHipster
Post 2 of 3
Series · Microservices with JHipster
Post 2 of 3
- Create full Microservice stack using JHipster Domain Language under 30 minutes
- Deploying JHipster Microservices on Azure Kubernetes Service (AKS)
- How to set up Java microservices with Istio service mesh on Kubernetes
If you are developing and deploying applications to production, especially cloud, you would have heard about Kubernetes. Kubernetes(k8s) is a container orchestration platform originally developed by Google and makes deploying containerized/dockerized applications to production more manageable and scalable.
Kubernetes has been crowned as the undeniable champion of container orchestration for a while now and every other K*S offering that we see sprouting up are testimonials for that. The K obviously stands for Kubernetes and S/E stands for Service/Engine and the first letter stands for the product offering it. So far we have AKS(Azure), GKE(Google), and EKS(Amazon ECS) and PKS(Pivotal) and also some flavors from Oracle and RedHat(read Openshift)
One of my colleagues have written a nice article about it, I highly recommend you read it as well.
In this article, we will see how we can deploy a microservice architecture created by JHipster to Azure Kubernetes Service.
Azure Kubernetes Service(AKS) is the managed Kubernetes platform offering from Microsoft to host your containerized applications.
Creating the microservice application
In one of my previous posts, I showcased how to create a full stack microservice architecture using JHipster and JDL, read the post here if you want to learn more details about it. For this exercise, we will use the same application.
Let us recap the steps required.
Create a JDL file, let’s say app.jdl, and copy the below content into it.
Now create a directory called ecommerce and navigate into it. Run the JHipster import-jdl command. It could take a few minutes, especially the NPM install step.
$ mkdir ecommerce && cd ecommerce$ jhipster import-jdl app.jdlOnce the JHipster process is complete, you will see that we have our store gateway, invoice service and notification service created and ready for us. The process until this is explained in more detail in my previous post here and you can deploy the application locally using Docker as explained in that post. If you haven’t done that before I strongly suggest that step so that you get an idea of the application and you also can make sure it works locally on your machine.
Generating the Kubernetes configuration
Now that our application is ready, let us create the required configurations for Kubernetes using JHipster. This can also be done using JDL by adding below snippet to the JDL file we used earlier.
deployment { deploymentType kubernetes appsFolders [store, invoice, notification] serviceDiscoveryType eureka dockerRepositoryName "deepu105" // use your own docker repo username here kubernetesNamespace jhipster kubernetesServiceType LoadBalancer monitoring no}For now, let us use the JHipster CLI to do this. In the ecommerce folder, we created earlier, create a new directory, let’s call in k8s so that we get the below structure.
├── app.jdl├── invoice├── kubernetes├── notification└── storeCreate the kubernetes directory and navigate to it. Now run the JHipster Kubernetes command there.
$ mkdir kubernetes && cd kubernetes$ jhipster kubernetesThe generator will ask you a few questions and choose the answers as highlighted below, as you can see the questions are very similar to the ones asked by jhipster docker-compose command. For the “base Docker repository name” provide your own docker hub account id(For example, my Docker Hub id is deepu105). For real-world use cases, you could also use a private image repository like the Azure Container Registry and in that case, you would have to provide the ACR login server name here. For now, let us keep it simple.
⎈ Welcome to the JHipster Kubernetes Generator ⎈Files will be generated in folder: /home/deepu/workspace/temp/ecommerce/kubernetes✔ Docker is installed
? Which *type* of application would you like to deploy? Microservice application
? Enter the root directory where your gateway(s) and microservices are located ../
3 applications found at /home/deepu/workspace/temp/ecommerce/? Which applications do you want to include in your configuration? invoice, notification, store
? Do you want to setup monitoring for your applications ? No
? Which applications do you want to use with clustered databases (only available with MongoDB and Couchbase)?
JHipster registry detected as the service discovery and configuration provider used by your apps
? Enter the admin password used to secure the JHipster Registry admin
? What should we use for the Kubernetes namespace? jhipster
? What should we use for the base Docker repository name? <your Docker hub account id>
? What command should we use for push Docker image to repository? docker push
? Do you want to enable Istio? No
? Choose the kubernetes service type for your edge services LoadBalancer - Let a kubernetes cloud provider automatically assign an IPThe generator will go to work with this and will create the following files and output.
create invoice/invoice-deployment.yml create invoice/invoice-service.yml create invoice/invoice-mysql.yml create notification/notification-deployment.yml create notification/notification-service.yml create notification/notification-mongodb.yml create store/store-deployment.yml create store/store-service.yml create store/store-mysql.yml create README.md create registry/jhipster-registry.yml create registry/application-configmap.yml create kubectl-apply.sh
WARNING! Kubernetes configuration generated with missing images!
To generate the missing Docker image(s), please run:
./gradlew -Pprod bootWar jibDockerBuild in /home/deepu/workspace/temp/ecommerce/invoice
./gradlew -Pprod bootWar jibDockerBuild in /home/deepu/workspace/temp/ecommerce/notification
./gradlew -Pprod bootWar jibDockerBuild in /home/deepu/workspace/temp/ecommerce/store
WARNING! You will need to push your image to a registry. If you have not done so, use the following commands to tag and push the images:
docker image tag invoice deepu105/invoice docker push deepu105/invoice
docker image tag notification deepu105/notification docker push deepu105/notification
docker image tag store deepu105/store docker push deepu105/store
You can deploy all your apps by running the following script: ./kubectl-apply.sh
Use these commands to find your application's IP addresses: kubectl get svc store
Congratulations, JHipster execution is complete!As you can see the generator creates all the required Kubernetes configuration files and prints out useful information to proceed further (Note that the docker hub id you provided will be in the instructions in place of deepu105 here). Go through the generated k8s files and familiarize yourself.
Now we are ready.
Let us build and push the docker images for our application. Follow the instructions above and build docker images in each of the application folders and then tag and push the images to your Docker hub account.
Preparing AKS Cluster
Now that our applications are built and pushed its time for us to deploy them to AKS. But before that let’s make sure we have all the prerequisites ready. You will need the below tools.
-
kubectl: The command line tool to interact with Kubernetes. Install and configure it.
-
Azure CLI: The command line tool to interact with Azure. Install and log in with your Azure account(You can create a free account if you don’t have one already).
Once the tools are ready let us prepare our Kubernetes cluster.
First, let us create a resource group. Run the below command. This will create a resource group named eCommerceCluster in US east location(You can use other Azure regions as well).
$ az group create --name eCommerceCluster --location eastusNow let us create an AKS cluster on the resource group we just created. Run the below command to create a cluster named eCommerceCluster with two nodes(We would need some room to run all those containers). It also enables the Azure monitor on the cluster through the add-on specified.
$ az aks create --resource-group eCommerceCluster \--name eCommerceCluster --node-count 2 \--enable-addons monitoring --generate-ssh-keysThis would take several minutes to complete hence be patient and have a coffee :)
Did I emphasize on several minutes?
Once it’s done you should see the cluster information printed out as JSON.
Now, let us configure kubectl to connect to the AKS cluster we just created. This can be done automatically using the Azure CLI by running the below handy command.
Note: Some Azure CLI commands might take a while to execute, especially if you are on a slow network, sometimes if the below commands seem stalled or if it is timed out, kill it and retry again.
$ az aks get-credentials --resource-group eCommerceCluster --name eCommerceClusterVerify that we are able to connect to the cluster by running kubectl get nodes
$ kubectl get nodesNAME STATUS ROLES AGE VERSIONaks-nodepool1-34429729-0 Ready agent 22m v1.9.9aks-nodepool1-34429729-1 Ready agent 22m v1.9.9Deploying the application to AKS
Now that our cluster is ready, let us deploy our microservice stack to this cluster.
We can deploy our application using the kubectl apply command for this we have to navigate to the k8s folder we created earlier and run the below commands in the same order
$ kubectl apply -f registry
$ kubectl apply -f invoice
$ kubectl apply -f notification
$ kubectl apply -f storeOr you could also just run the handy kubectl-apply.sh script generated which runs the above.
So we are deploying the JHipster Registry first as it is required for other services, followed by the microservices and finally our gateway(store).
If you get a timeout during any of these, as I did, just try the command again.
Though the services get created fast, the actual applications might not be up and running yet, give the entire thing a minute or two to start.
Now run kubectl get pods to see the status of our containers.
$ kubectl get pods -w
NAME READY STATUSinvoice-5ffb46d944-h8x42 1/1 Runninginvoice-mysql-66bc4b7874-p7ghk 1/1 Runningjhipster-registry-0 1/1 Runningjhipster-registry-1 1/1 Runningnotification-76847b7667-d7xjb 1/1 Runningnotification-mongodb-6db986b556-8bw8z 1/1 Runningstore-8dc5cd6f7-s2dpx 1/1 Runningstore-mysql-779d66685d-tmkqd 1/1 RunningNote: I have removed some info for brevity in the above output.
Wait until all the containers are in Running status. Once the containers are running we can run the kubectl get service command to get the external IP for the application.
$ kubectl get service store
NAME TYPE CLUSTER-IP EXTERNAL-IP PORT(S) AGEstore LoadBalancer 10.0.189.145 40.117.140.228 8080:30143/TCP 18mIn this case, the external IP for our gateway application is 40.117.140.228 running on port 8080. Let us open it up in a web browser.
 The Gateway application login page
The JHipster registry is deployed as a headless service by default. If we need to access the registry we need to create a secondary service with a Load Balancer. Run the below command to expose the second service.
$ kubectl expose service jhipster-registry --type=LoadBalancer --name=exposed-registryNow run the kubectl get service command to get the IP.
$ kubectl get service exposed-registry
NAME TYPE CLUSTER-IP EXTERNAL-IP PORT(S)exposed-registry LoadBalancer 10.0.107.121 104.211.15.142 8761:32628/TCPVisit the URL in a browser to see the registry in action
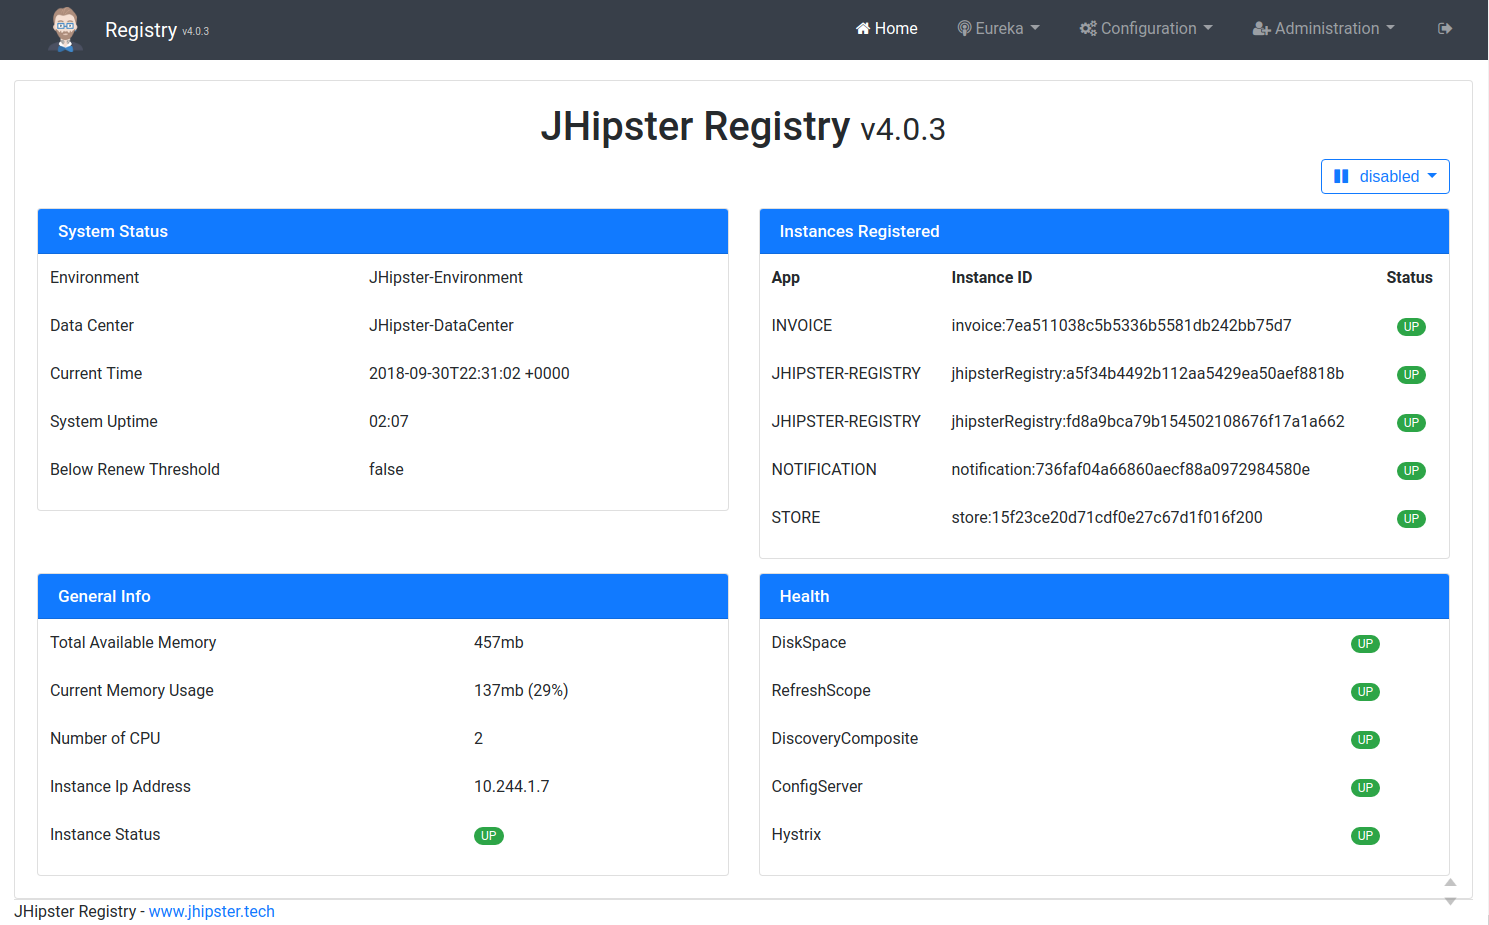 JHipster Registry home page
We can now scale any of our services by simply running kubectl scale command. For example, let us scale our Invoice service.
$ kubectl scale --replicas=2 deployment/invoiceNow we can visit the Eureka -> Instances on our Registry and see that the Invoice service has two instances.
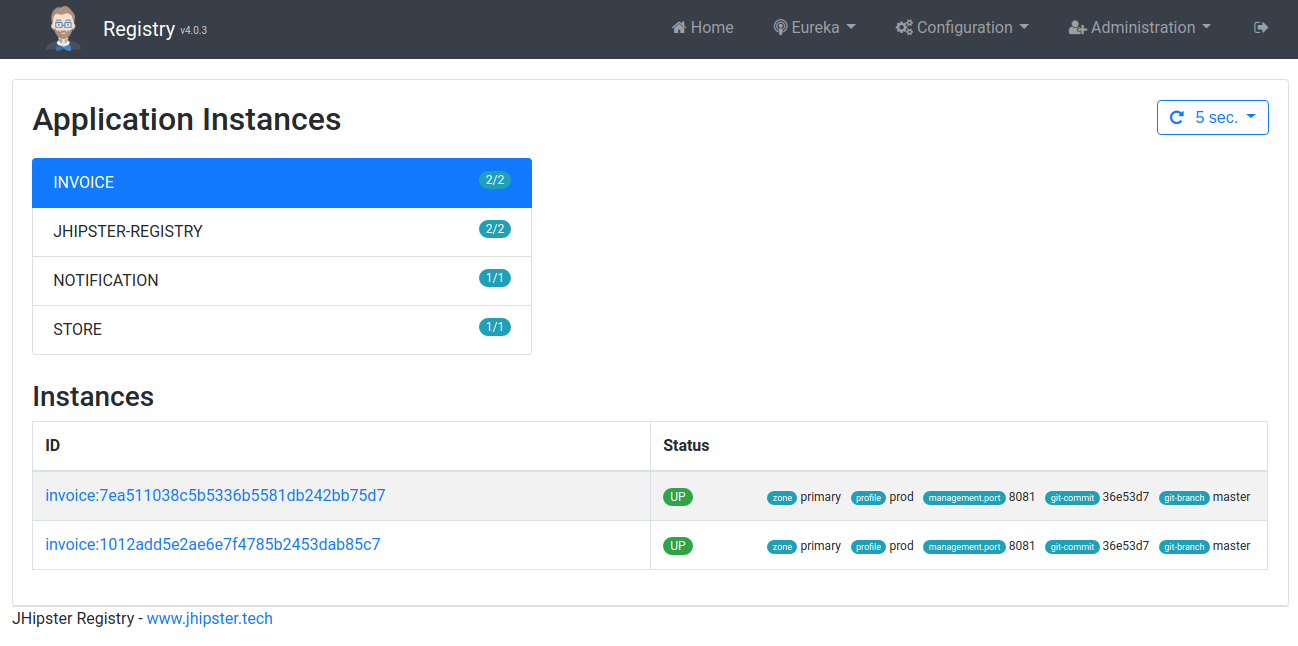 JHipster Registry instances page
Running kubectl get pods will also show you the new instance.
$ kubectl get pods
NAME READY STATUS AGEinvoice-5ffb46d944-g8j6j 1/1 Running 4minvoice-5ffb46d944-h8x42 1/1 Running 2hinvoice-mysql-66bc4b7874-p7ghk 1/1 Running 2hjhipster-registry-0 1/1 Running 2hjhipster-registry-1 1/1 Running 2hnotification-76847b7667-d7xjb 1/1 Running 2hnotification-mongodb-6db986b556-8bw8z 1/1 Running 2hstore-8dc5cd6f7-s2dpx 1/1 Running 2hstore-mysql-779d66685d-tmkqd 1/1 Running 2hThat is it, we have successfully got our application deployed to AKS and scaled our service on demand.
Cleanup
Once you are done its always a good idea to clean up especially since we don’t want to keep unnecessary resources that might eat up our free credits on Azure.
Let us delete the cluster from AKS and related resources created by deleting the entire resource group.
$ az group delete --name eCommerceCluster --yes --no-waitCluster related activities like creation/update/deletion could take several minutes on AKS so we have to be patient again here.
Conclusion
Kubernetes is definitely the best way to deploy microservice applications to production but creating and managing Kubernetes clusters itself is not an easy task, but Kubernetes services like GKE and AKS makes it a cakewalk. In my personal experience, the Kubernetes service from Google(GKE) and Azure(AKS) are by far the best in terms of ease of use and available tooling. These services provide very handy command line tools which work nicely together with kubectl to provide a very nice experience. They also have nice UI portals if you are not a fan of the CLI.
JHipster provides a great Kubernetes setup to start with which you can further tweak as per your needs and platform.
In upcoming posts, we will look at more services like GKE(Google), EKS(Amazon) and Openshift(RedHat)
To learn more about JHipster, check out my book “Full Stack Development with JHipster” on Amazon and Packt.
If you like JHipster don’t forget to give it a star on Github.
If you like this article, please leave a like or a comment.
You can follow me on Twitter and LinkedIn.
My other related posts:
-
Create full Microservice stack using JHipster Domain Language under 30 minutes
-
JHipster microservices with Istio service mesh on Kubernetes
Originally published in Medium on Oct 01, 2018